


With this guide, you connect Claude to your own WordPress site through WordPress MCP. Once it’s connected, Claude reads your site’s posts, pages, comments and settings directly, and if you allow it, it creates drafts and edits them. No more copying and pasting text between the chat and the WordPress admin panel! It can even install plugins, test them and set them up.
I’m Mohsen Tavoosi, and I set up this connection on my own site and work with it every day. That’s why every step has its own real screenshot, and I’ve also put the errors you might run into at the end of the guide!
I don’t write a single line of code, and you won’t be learning to code here either. You don’t need to. Wherever something has to be typed, the text is ready and you just copy it! You know me by now. I’m happy to spoon-feed you everything. This free guide is a small part of the video lessons in my SEO course with AI. And once AI is connected to your tools and your site, the game has only just begun. The real battle starts after the connection!
Why do you need a WordPress MCP plugin to connect Claude to WordPress?
To connect to any tool or site, AI needs a shared language, or protocol. This protocol is called MCP, short for Model Context Protocol. Any AI that understands MCP can connect to any service that has MCP! You can read the MCP documentation, which its makers publish. You can also use my own MCP, at mohsentavoosi.com/skills!
WordPress doesn’t have MCP by default. That’s also why Claude’s list of ready-made connectors (a connector is a link that connects Claude to another tool) has no option for your WordPress site. So we install a plugin that adds MCP to the site, and then we give its address to Claude. I use the Easy MCP AI plugin. Keep in mind that every MCP needs a server. That server is either your own computer (inside an installed AI app like Claude Desktop) or one the maker of the MCP runs, and those are usually not free.
The same rule applies to other tools. If a tool you work with has no MCP, ask its maker to build one! And I mean exactly an MCP, not an API! If they tell you they offer an API, tell them that’s not enough. We are not programmers, we are not technical people, and all we need is a simple MCP. Tools that don’t offer an MCP and stop at an API are going to disappear! Non-technical users are a huge group, in fact the majority. The more they work with AI, the more they will need tools with MCP, and a tool without one will slowly lose most of its users.
What do you need before you start?
Get these ready:
- Administrator access to the WordPress admin panel.
- A Claude account with a Connectors section in its settings.
- A site address with HTTPS. Claude only accepts an address that starts with HTTPS.
Step 1. How do you install the Easy MCP AI plugin?
In the WordPress admin panel, go to Plugins and then Add New. In the search box, type “MCP”. Several plugins come up. After checking them, I installed Easy MCP AI.
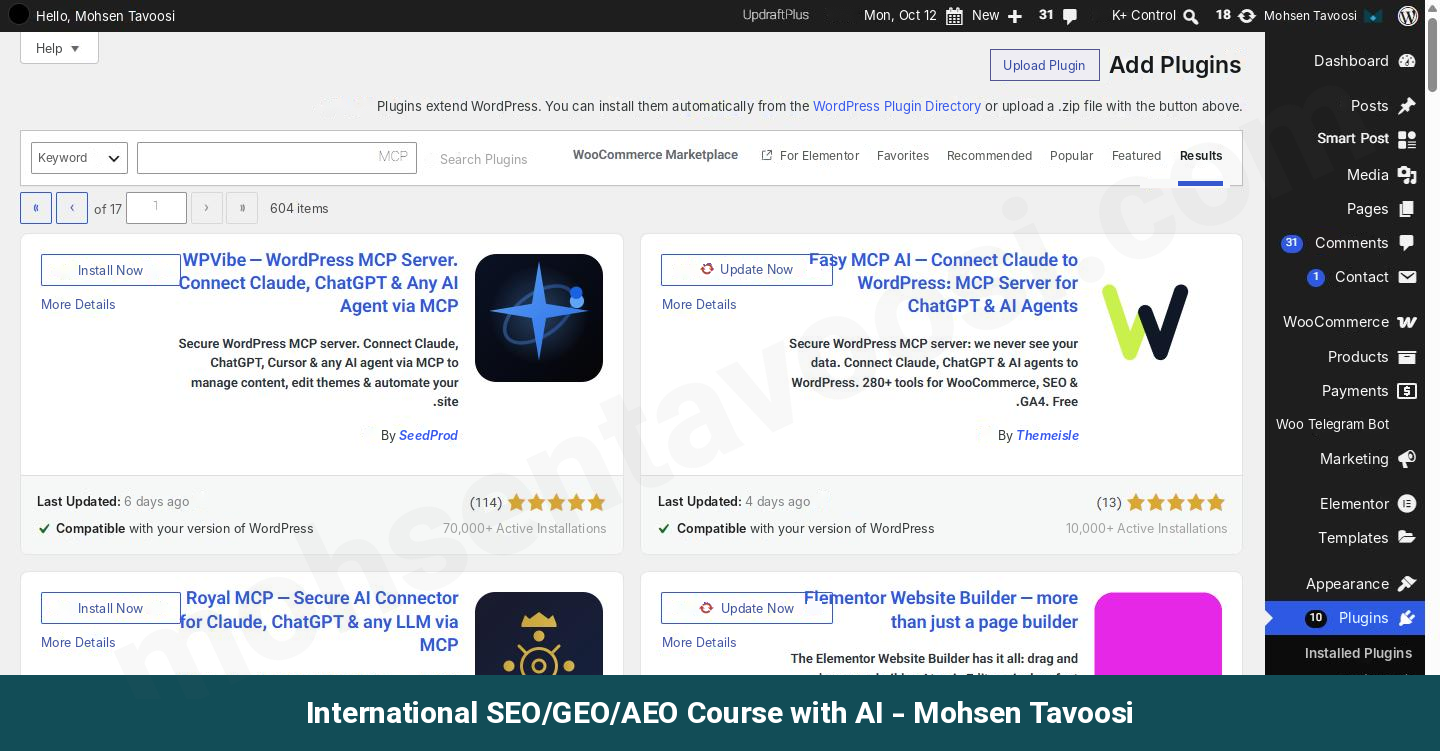
Click Install and then Activate. Once it’s active, a new menu called Easy MCP AI appears in the admin panel.
Step 2. Where do you get the site’s MCP address?
On the plugin’s first page (Dashboard) there is a box titled MCP URL, with a copy icon next to it. Copy this address!
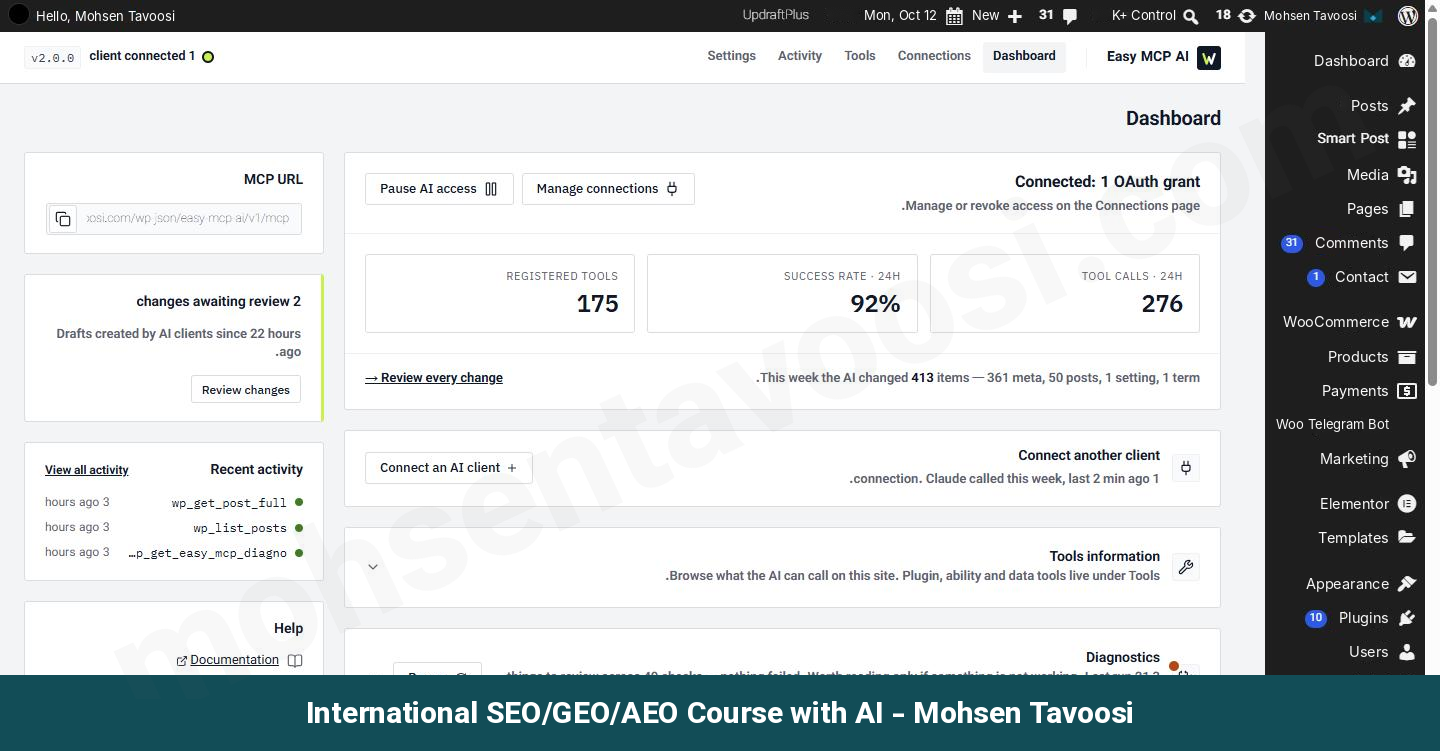
Your address looks like this, with your own site’s domain in place of mine:
Your site’s home page address won’t work. It has to be exactly the address above!
Step 3. How do you add a custom connector in Claude?
In Claude, click the + sign next to the chat box and choose Connectors. Then click Add connector, and finally Add custom connector.
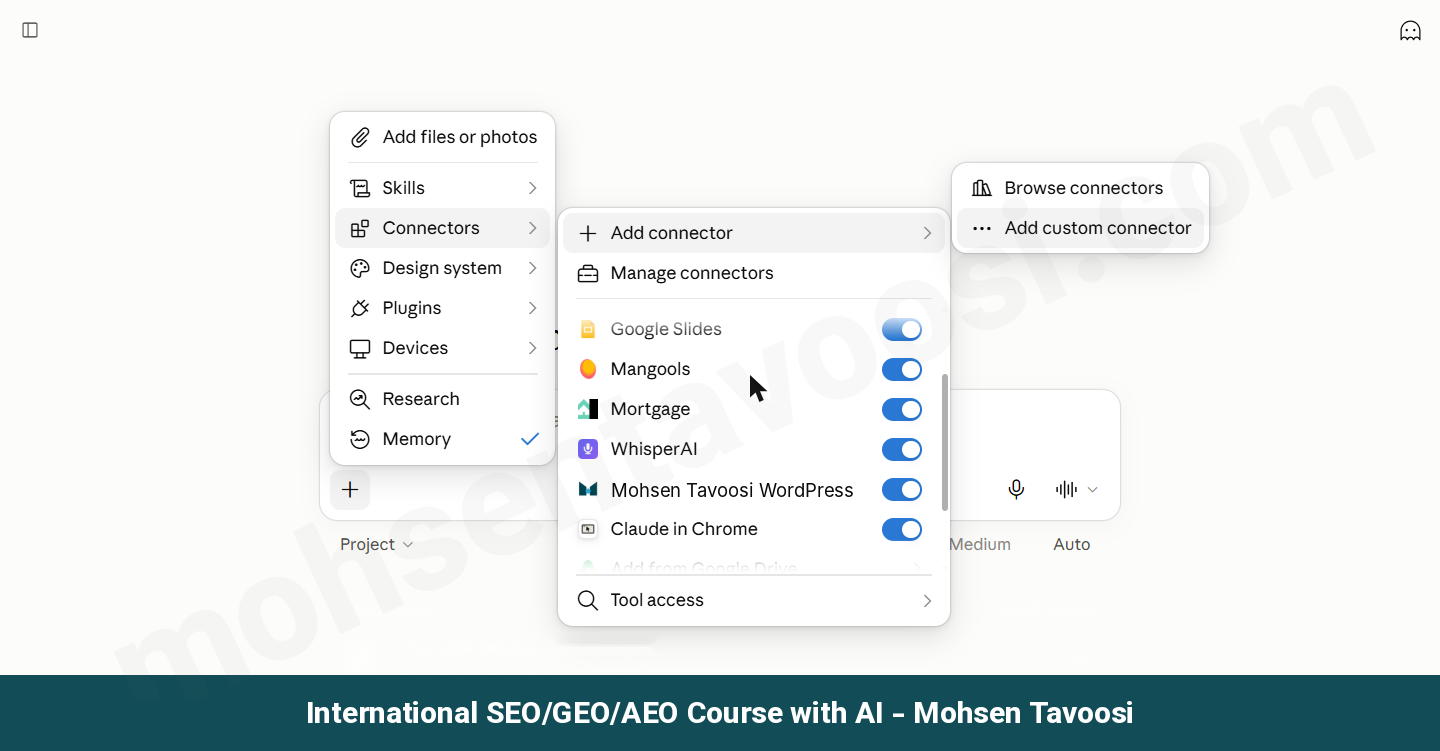
A second way goes through Claude’s settings. Open Settings, go to Connectors and click the Add button.
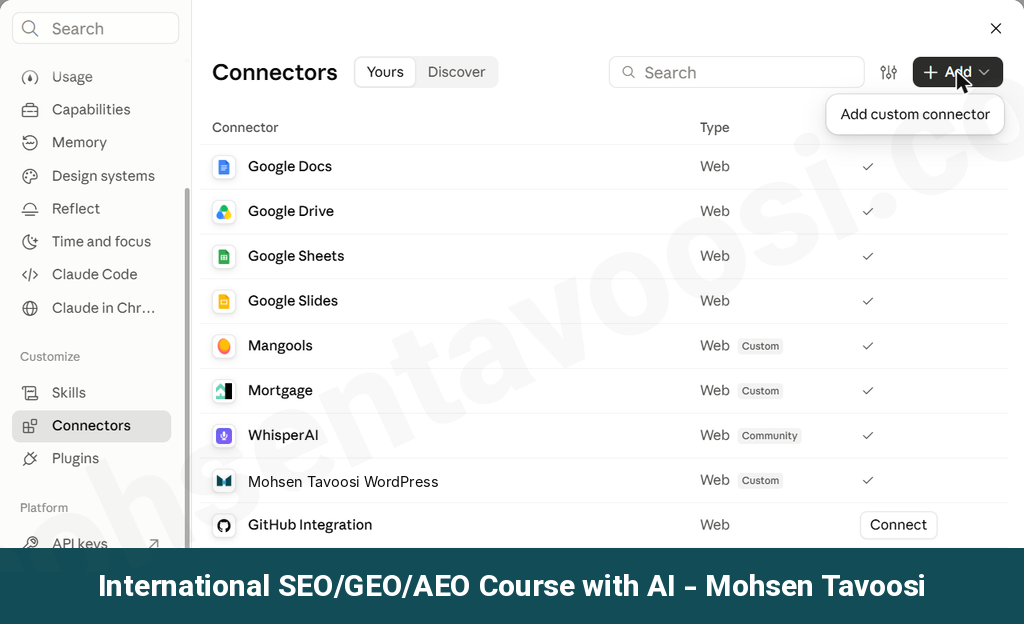
A window opens with two boxes. In the Name box, write any name you like, for example your site’s name. Only you see this name, in your own list of connectors. In the MCP server URL box, paste the address you copied in step 2.
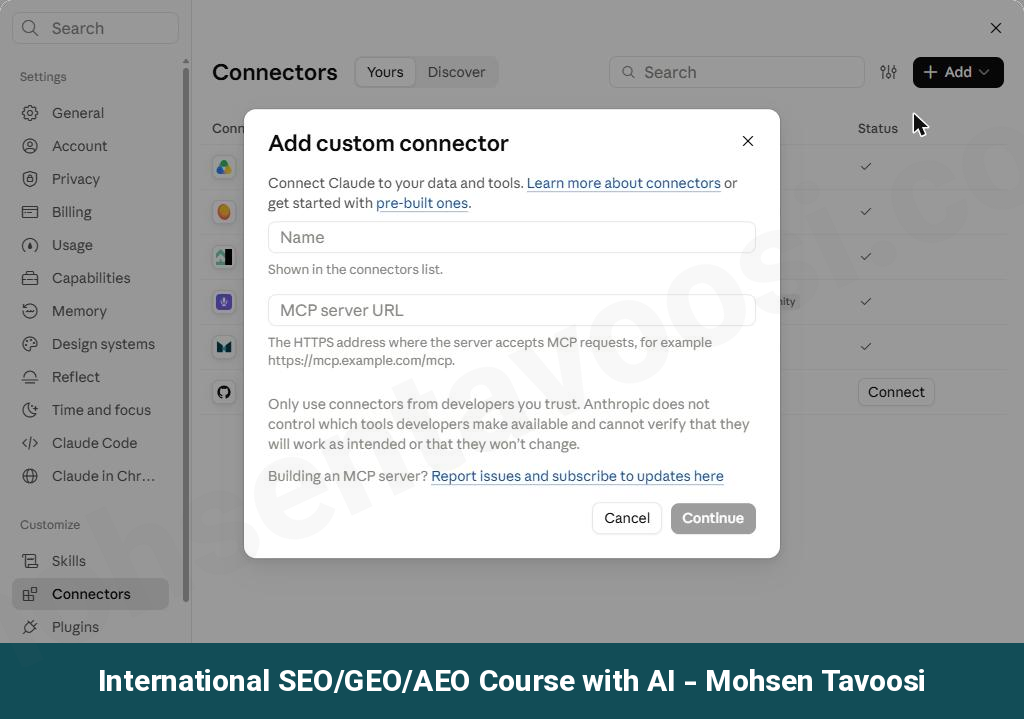
Under the boxes there is a message from Anthropic saying you should only use connectors from developers you trust. This message shows up for every custom connector. You installed the plugin yourself, on your own site, so click Continue!
Step 4. How do you answer the WordPress approval page?
After Continue, a page from your own site opens. Here WordPress asks what access Claude should have. Confused? Don’t worry, there are only three options:
- Read-only. Claude only reads and changes nothing.
- Full access. Claude has access to all of the plugin’s tools, from reading to writing and deleting.
- Custom. You choose which tools stay open.
For reports and analysis only, Read-only is enough. If you want Claude to create and edit drafts, you need Full access or Custom. I chose Custom, because I don’t want things like creating new users to be in Claude’s hands! Close every tool you don’t need.
You give this approval once for the whole connection. It doesn’t cover each separate task! Approving each task is a separate setting, which I explain in step 6.
Step 5. How do you know Claude is connected to WordPress?
After you approve, you return to Claude and the connector shows up in the list. Open a new chat and ask a simple question, for example “What is the latest post on my site?”. Claude calls the WordPress tool and comes back with the title of the latest post.
Checking from the WordPress side works too. Open Connections in the Easy MCP AI menu and go to the OAuth tab. OAuth is the method Claude uses to get permission from WordPress without ever getting your password. Here you see a client named Claude, with the status Active. Under Active grants, you also see the access level you chose.
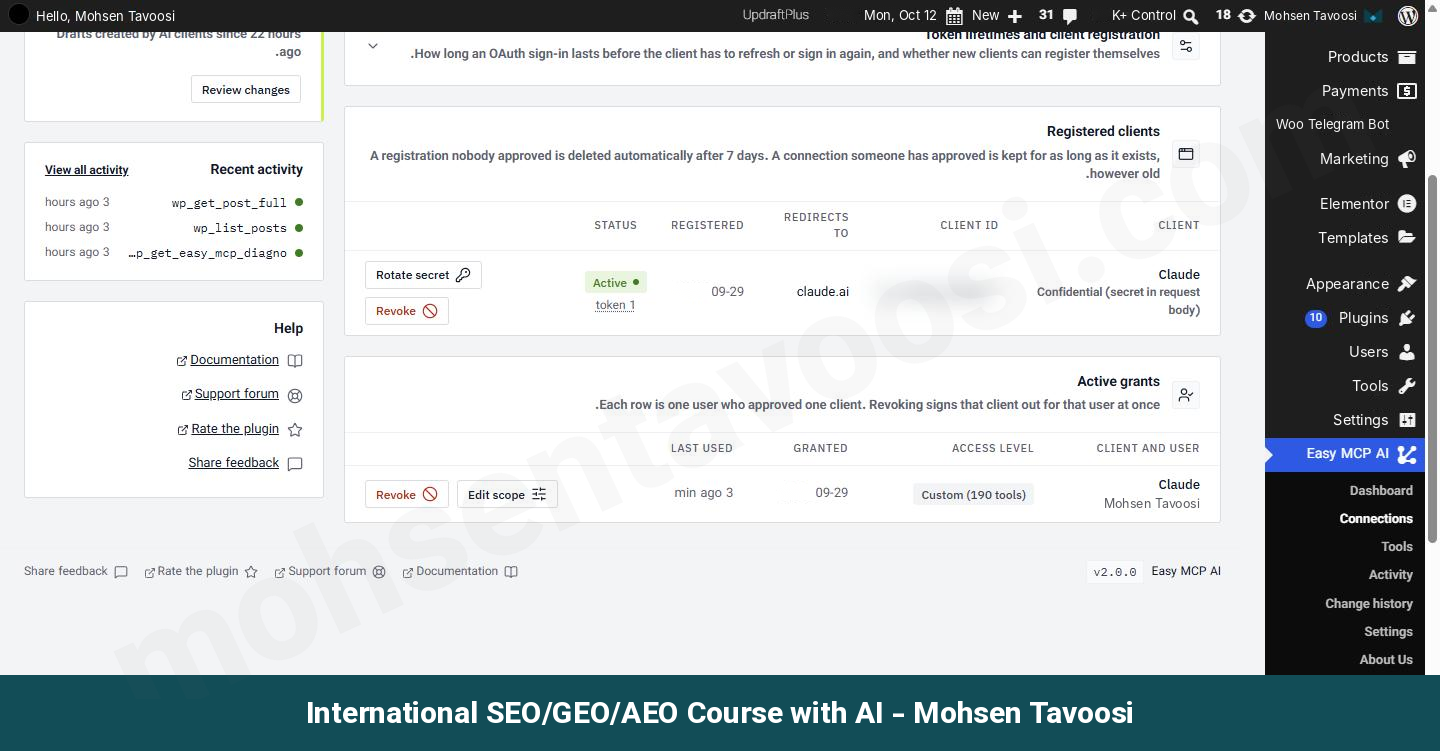
You also find the Revoke button right here. Revoke means cancelling access. If one day you don’t want Claude connected to your site anymore, one click cuts its access!
Step 6. Where do you set manual or automatic approval for tools?
This setting exists in two places. One is in Claude itself, and the other is in the Easy MCP AI plugin.
In Claude, the path goes like this. You open Settings, then Connectors, and then your WordPress connector. At the bottom of the page there is a section called Tool permissions.
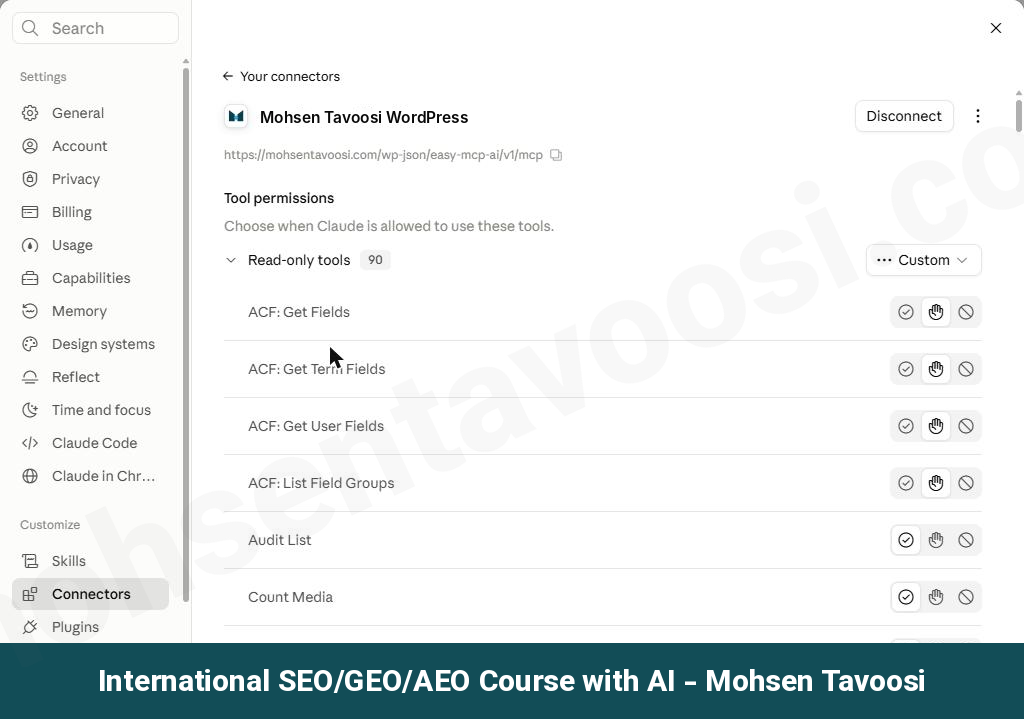
Claude splits the tools into two groups, Read-only tools and Write/delete tools. Each tool can be in one of three states:
- Always allow. Claude runs it without asking.
- Needs approval. Claude asks for your permission every time before it runs the tool.
- Blocked. It never runs.
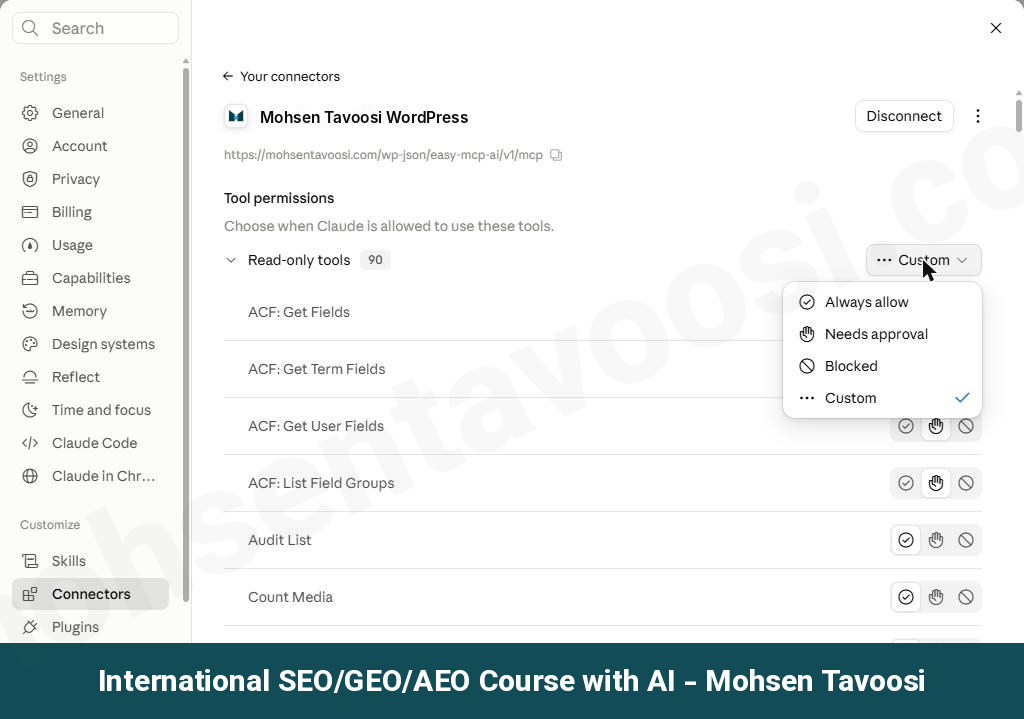
Next to each group’s name there is a dropdown menu that changes the state of every tool in that group at once.
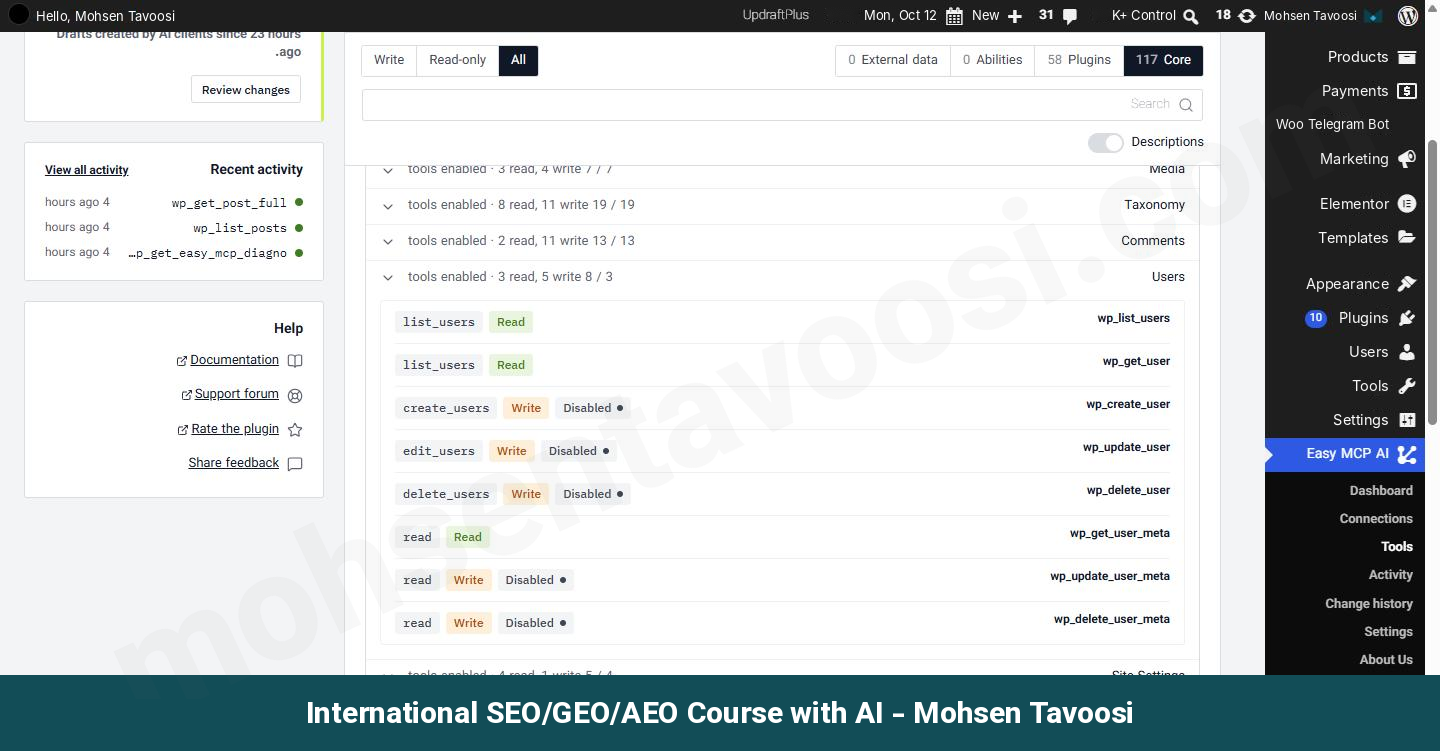
On the plugin side, there are also two places for this. First, the Tools page. Here all of the plugin’s tools are listed group by group, and next to each tool you see whether it reads (Read) or writes (Write), and whether it’s active or turned off (Disabled). For example, I turned off creating, editing and deleting users.
Second, the Settings section of the Easy MCP AI menu. At the bottom of the page, in the Advanced part, there is a list called Disabled tools. Tick a tool there and click Save changes, and that tool is turned off for every AI connected to the site. That means even if it’s set to Always allow in Claude, it still won’t run!
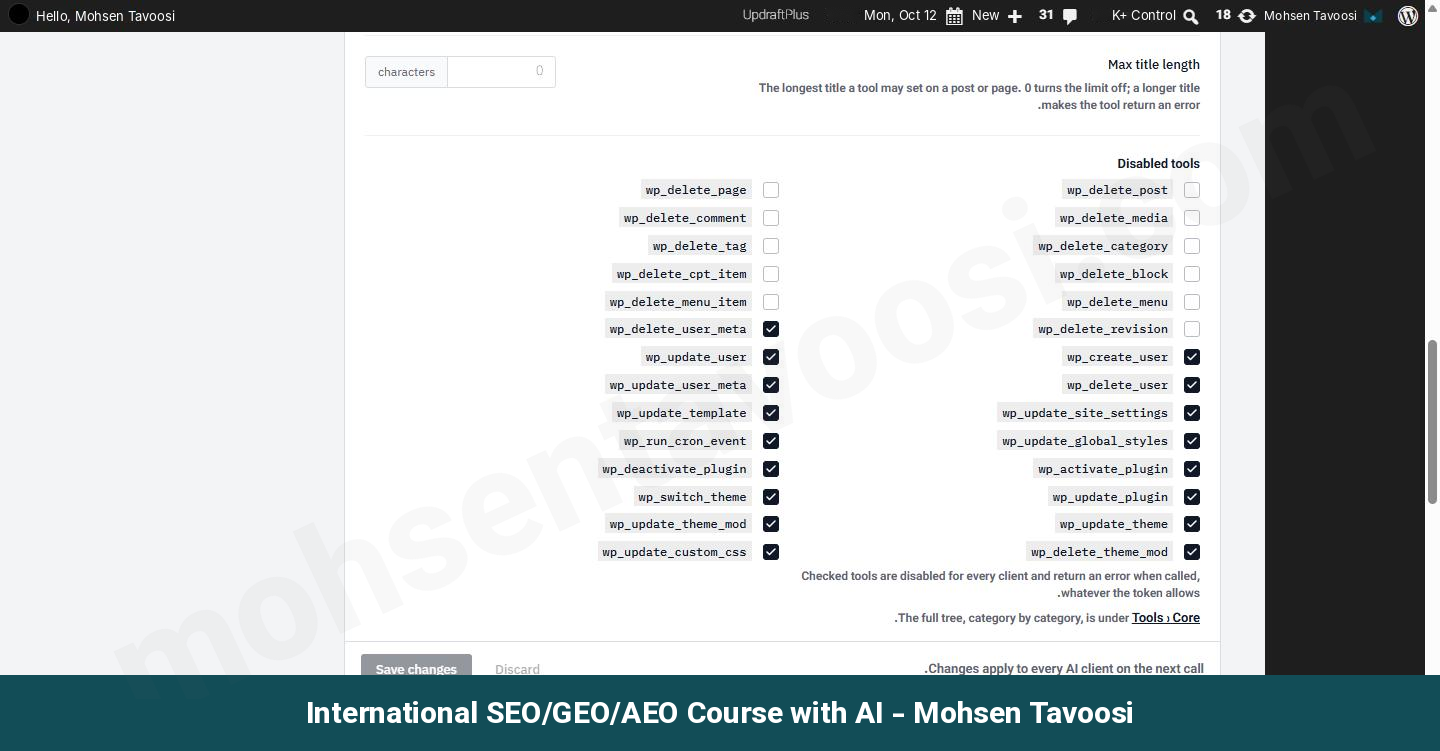
Two places for one job? Confused? I understand, but the difference between them is simple. In Claude, you choose whether each tool runs with your permission or without it. In the plugin, you choose whether a tool exists at all.
Mohsen Tavoosi’s advice here is simple. Keep the write and delete tools on Needs approval. Read-only tools don’t change anything, but they do have access to your site’s information! If you run a WooCommerce store, keep the tools that read orders and customer information on Needs approval too.
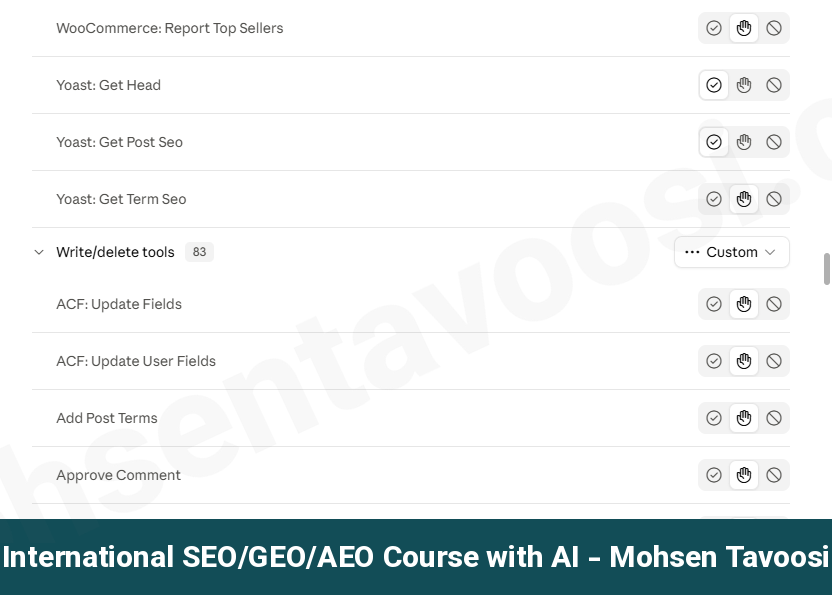
Keep manual approval for at least the first 2 to 3 months! There are three reasons:
- You see exactly what Claude wants to do each time, and you learn how to work with it.
- A mistake by Claude, or a wrong instruction from you, won’t break the site.
- You learn how many tools each task calls and how much of your Claude usage limit it uses.
After a few months, once you’re confident, move the tools you always approve to Always allow, one at a time. Which SEO tasks to hand over to Claude after the connection, and which ones to keep for yourself, is something I’ve taught in detail in the SEO course.
Changed a setting in Claude but see no effect in the chat? Then close the chat and open a new one. A new setting only applies in a new chat.
Step 7. How do you create a test post with Claude?
For the test, ask for something harmless. I said “Create a draft titled Test in the Uncategorized category”. The post creation tool was on Needs approval, so Claude asked for permission first. When I approved it, the draft was created, and I saw it in the WordPress posts section.
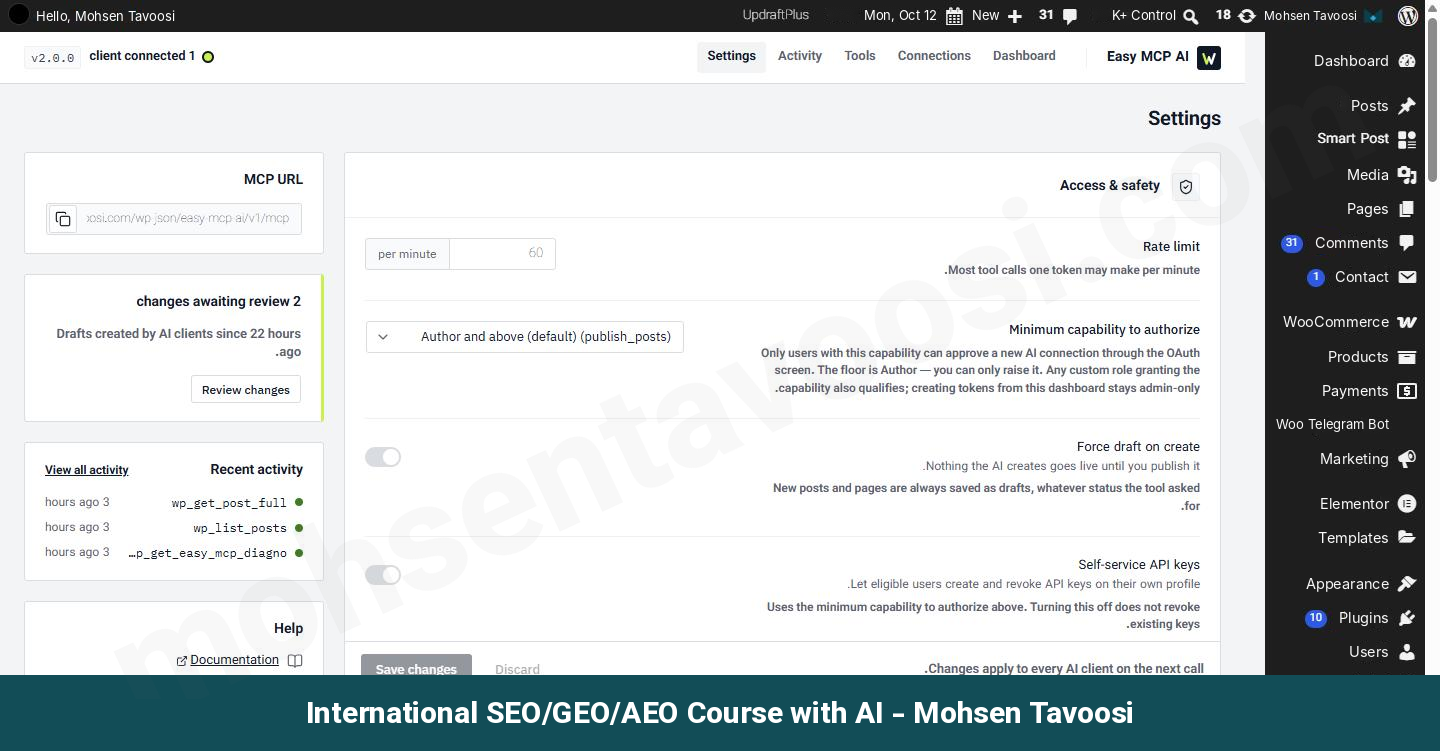
The plugin has one more setting you should know about. Under Settings in the Easy MCP AI menu, there is an option called Force draft on create. If it’s on, every post and page Claude creates becomes a draft, even if Claude wants to publish it. On my site it’s off for now, because I use manual approval. Just starting out? Turn it on!
How can you see what Claude has done on your WordPress site?
There are two ways:
- On the plugin dashboard, the Recent activity section shows the last tools that were called, and the Activity tab has the full list.
- Ask Claude itself to read the log of the actions it took. There is a tool called wp_audit_list for exactly this.
The risk of AI messing up your site!
This connection lets Claude write and delete on your site. One wrong instruction, or Claude misreading what you meant, can change or delete a post. So do these three things:
- Keep the access level at Read-only or Custom wherever you can.
- Set the write and delete tools to Needs approval.
- If something feels wrong, Revoke the connection from the OAuth tab.
In its API tokens section, the plugin can also create tokens. A token is a long string that starts with wpmcp and, like a password, opens access to your site. Never put this token in a screenshot, in a chat, or anywhere other people can see it!
Errors and quirks
How do you fix the Couldn’t register error?
Seeing the Couldn’t register message? Don’t worry, there is a fix! Before it connects, Claude reads two addresses from the root of your site. If these two addresses return a 404 error (page not found), the connection fails and you get Couldn’t register. These are the two addresses:
First, add each of them after your own site’s domain and open it in the browser. Seeing a 404 error? Try these fixes in order:
- Check the MCP address. It must be the address from step 2, not your home page address.
- In the admin panel, go to Settings and then Permalinks. Without changing anything, just click Save. Then open the two addresses above in the browser again.
- If you don’t have access to your host, install the Redirection plugin (or use the Redirections module in the Rank Math plugin) and create two redirects. The source of the first one is /.well-known/oauth-authorization-server and its target is /wp-json/easy-mcp-ai/v1/.well-known/oauth-authorization-server. Do the same for the second one with oauth-protected-resource.
- If you have access to your host, open the .htaccess file (the server settings file in the site’s root folder) and put the text below above the BEGIN WordPress line. After that, clear the site cache (the saved copies of pages that caching plugins create).
If the 404 error is still there after all of this, the host itself is blocking these addresses, and you need to ask the host’s support team. On the plugin dashboard, the Diagnostics card also shows the fix for your specific host. Check that card as well!
You may see a suggestion somewhere to put the token inside the MCP address to skip OAuth. This doesn’t fix the 404 error, because Claude goes to OAuth first. And never put the token inside the address!
I added the connector. Why doesn’t it show up in the chat?
Close the chat and open a new one. Then click the + next to the chat box and open Connectors. You should see the connector in the list with an on and off switch. Make sure it’s on.
Why did Claude change something on my site without asking?
Because the tool for that job was set to Always allow. Go back to step 6 and move the Write/delete tools to Needs approval. Check the tool settings yourself every time you add a connector.
This is Mohsen Tavoosi, and I wrote this guide from my own experience on my site. If you want to know which SEO tasks to use Claude for after the connection, take a look at my SEO course. The rest of my tutorials are on mohsentavoosi.com.
Frequently asked questions
What WordPress MCP plugin do I need for Claude?
You need a plugin that adds MCP to WordPress. I use Easy MCP AI. It’s in the WordPress plugin directory, and you find it by searching for MCP on the Add New Plugin page.
What is MCP?
MCP (Model Context Protocol) is an open protocol, meaning a shared set of rules that AI uses to talk to tools and sites. WordPress has no MCP by default, and that’s why you need a plugin.
Do I need a separate WordPress MCP server?
No. Your plugin adds the MCP address to your own site, so your WordPress site does the server’s job. You don’t install anything on your computer for this connection.
Does Claude have an official WordPress connector?
No. Claude’s list of ready-made connectors has no option for your own WordPress site. You add a custom connector and give it the MCP address of the plugin.
What does the MCP address of a WordPress site look like?
It’s your site’s domain followed by /wp-json/easy-mcp-ai/v1/mcp. You find it on the Easy MCP AI dashboard, in the MCP URL box. Your home page address won’t work.
Which access level should I give Claude?
For reports and analysis, Read-only is enough. For creating and editing posts, Custom is better, because only the tools you need are open. Full access opens every tool, even creating users.
What are Tool permissions in Claude?
A setting on each connector’s page. It decides whether each tool runs without asking (Always allow), runs only with your permission (Needs approval), or never runs (Blocked).
Where do I turn tools off in the Easy MCP AI plugin?
In the Easy MCP AI menu, under Settings and then Advanced, there is a Disabled tools list. A ticked tool is off for every AI connected to the site, even if Claude has it on Always allow. On the Tools page you also see, group by group, which tools are active and which are disabled.
How long should I keep manual approval on?
At least 2 to 3 months. During that time you see what Claude does, its mistakes can’t break the site, and you get a feel for how much of your Claude usage limit each task takes.
What does Force draft on create do?
It keeps every post or page Claude creates as a draft, even when Claude tries to publish it. You find this option in the Easy MCP AI menu, under Settings.
Can Claude break my WordPress site?
Within the access you give it, yes! The plugin does have tools that delete and edit. With the Custom access level and Needs approval on the write and delete tools, nothing changes without your approval.
Are read-only tools risky too?
They change nothing, but they do read your site’s information. On a WooCommerce store, that means orders and customer details. If this information is sensitive, put the WooCommerce read tools on Needs approval as well.
How do I see what changes Claude made on my site?
Open the Activity tab in the Easy MCP AI menu to see the tools that were called. You can also ask Claude to read the history of its actions with the wp_audit_list tool.
How do I disconnect Claude from WordPress?
You can do it in two places. In WordPress, go to the Easy MCP AI menu, then Connections, the OAuth tab and the Revoke button. In Claude, open the connector page and click Disconnect.
What is the wpmcp token, and where should I never put it?
It’s a string the plugin creates in the API tokens section, and like a password, it opens access to your site. Keep it out of screenshots, out of chats and out of the MCP address.
What causes the Couldn’t register error?
Claude couldn’t find the two addresses /.well-known/oauth-authorization-server and /.well-known/oauth-protected-resource on your site. Saving the permalinks again, redirecting these two addresses or adding a few lines to the .htaccess file usually fixes it.
Why don’t my new tool settings take effect in the chat?
Because the old chat was opened with the old settings. Close it and open a new chat.
Can ChatGPT or another AI connect to WordPress too?
Any AI that supports MCP can connect to the site with the same MCP address. Each tool has its own steps, and this guide shows the steps for Claude.
Do I need to know how to code for this?
No! You install a plugin, copy an address and click a few buttons. Even for the 404 error fix, the text is ready and you only copy it.